
HOW TO PROPERLY USE A POWER TROWEL
If you place concrete, or work around construction sites that do, then you are likely familiar with power trowel machines. They are the machines that look like upside down fans that sit on top of concrete and are used to trowel and finish a concrete slab.
Most power trowels are usually used on mid to large sized projects and can be a walk behind or ride-on design. Using a power trowel isn’t very difficult to do from a beginner’s standpoint – but it does take hours of experience to master them and use them like an artisan (which is how many experienced operators use them). But for those of us who may not be so familiar with them - this blog gives you the basics you need to understand and properly operate a power trowel.

THE WALK BEHIND TROWEL : BREAKING-IT-DOWN…
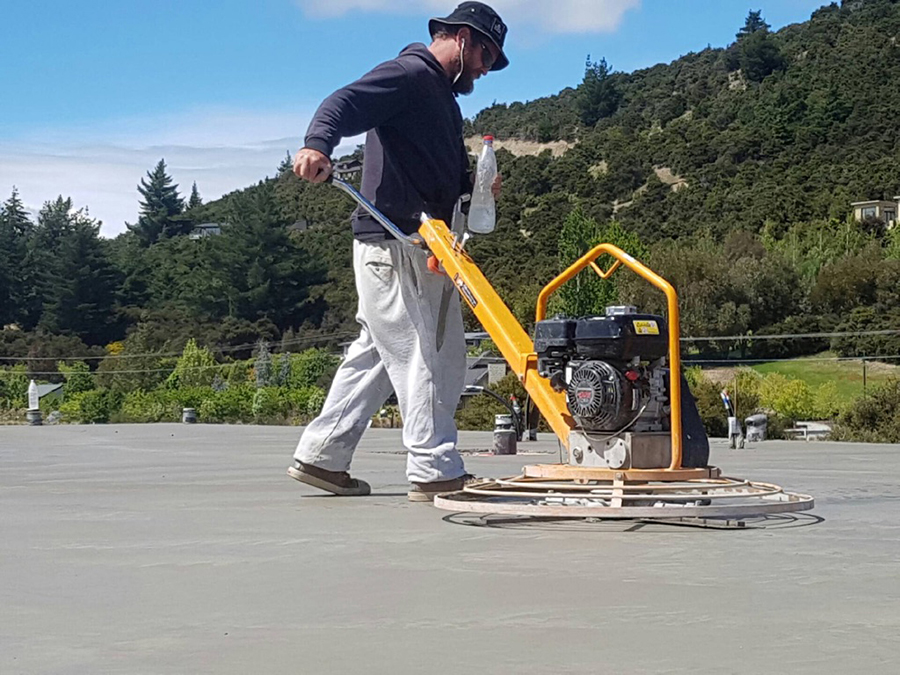
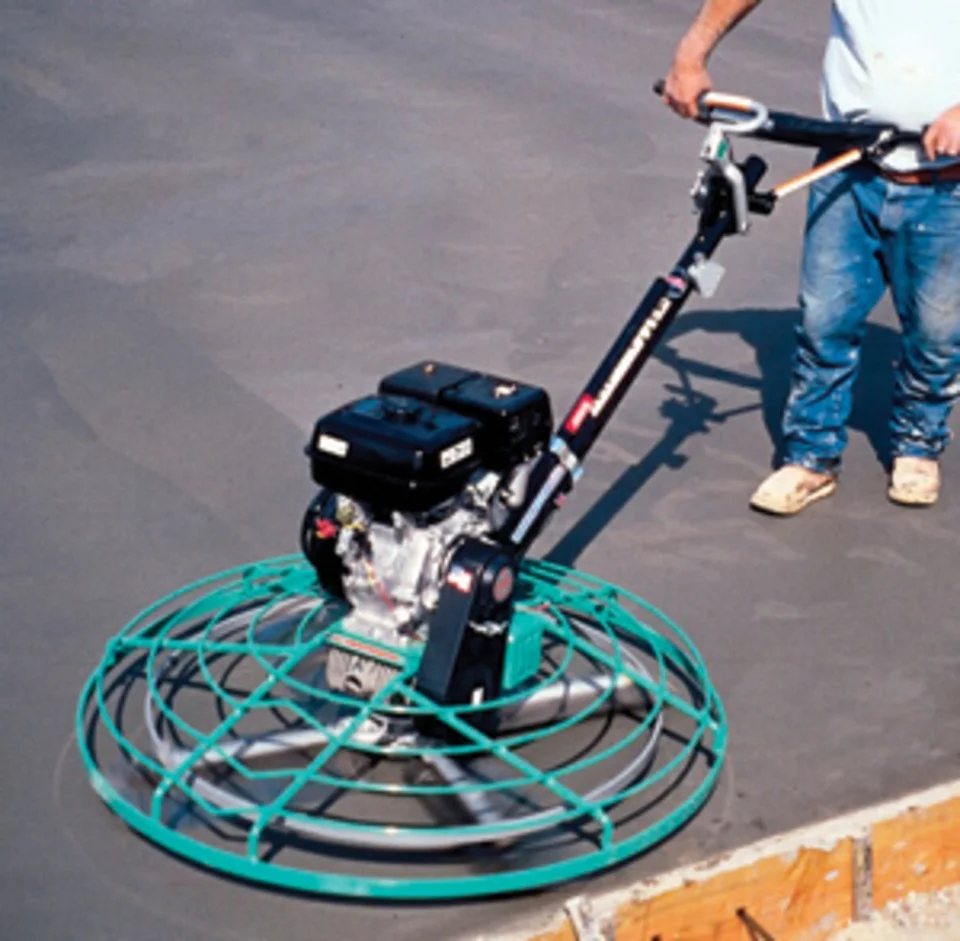
Let's start at the beginning…. Power trowels are fairly simple in their design and operation, but as an operator of any type of equipment, it’s important to know the key components, how they work, and why. There are 6 general components that make up a typical walk behind trowel: the handle, the engine, the gearbox, the spider assembly, the trowel blades and finally the safety ring.
The Handle is how the operator steers the unit and operates the controls mounted on the handle. The engine is the main driving force behind the machine which drives the shaft that enters the gearbox. The gearbox is the ‘heart’ of the unit which makes it critical to faithful operation and performance. The gearbox connects to and powers the spider assembly. That’s why having a reliable, well engineered gearbox is critical to any power trowel. The gearbox drives the spider assembly. Connected to the spider assembly are the trowel blades which spin in a fan-like motion when powered by the engine. Finally there is the safety ring which encompasses the spider assembly and protects the spinning blades.

STARTING FROM THE BOTTOM UP – THE TROWEL BASE
The base of the power trowel is “where the rubber meets the road” or in this case where the machine meets the concrete. The general purpose of any power trowel is to make lighter work of troweling and finishing concrete.
In any concrete pour there is the important step of troweling the concrete to continue the process of consolidating the concrete and to aid in the process of squeezing out the excess water and laitance. The process of troweling also aids in bringing the ‘cream’ of the concrete to the surface of the slab. Troweling also plays a key role in the final finish, as it helps hardens the concrete and improves the appearance of the finished slab.
POWER TROWEL ATTACHMENTS - BLADES AND PANS
When you are ready to start troweling it’s important to choose the right attachments/blades. The power trowels use blades and other plate-like attachments that are mounted on the spider assembly arms in order to accomplish the desired result in the process.
Float pans are large metal discs (pans) that attach to the bottom of the unit by clipping onto the trowel blades. Float pans are used in the early stages of troweling and are often used when the contractor wants to get on the slab as early as possible to start the process of troweling. Because float pans are essentially large discs that fasten to the bottom of the trowel, the large flat surface helps to distribute the weight of the machine evenly over a larger area allowing it to ‘float’ on top of the concrete instead sinking or digging in which could happen if you use typical trowel blades too early in the process.
Float blades are wide flexible blades that typically clip onto your finishing blades and provide a similar results to a float pans. The float blades also aid in distributing the weight of the machine over a larger surface area allowing the operator to start early with the troweling process. These blades provide flex when pitched and minimize mud-slinging and gouging of the concrete in the early stages.
Combo Blades are a hybrid type blade – they are wider and more flexible blades than finishing blades and are also used so that the contractor can get on the concrete faster and start the troweling process sooner. The blades are made of a wider flexible metal that distributes the weight of the machine and allows the machine to distribute its weight evenly over the concrete surface as the operator trowels. There is a little more ‘flex’ in the blade which allows for a more gradual contact between blade surface and concrete when pitched. Again – similar to float blades this avoids the aggressive edging that you would typically get from a finishing blade when it is pitched at a higher degree.
Finishing Blades are more narrow than combo blades and are typically more ridged. The stiffer more ridged blade allows the operator to put a more aggressive edge on the blades when it is pitched.

PITCHING THE BLADES OF A POWER TROWEL
The operator of a power trowel uses pitch to control how much edge of the blade he wants to put into contact with the concrete in order to accomplish three things:
continue the process of burning out the water from the slab (removing excess or trapped water)
bring the cream of the cement to the surface
finishing to the smoothness and hardness to the degree desired
Pans are usually attached to the bottom of the blades with the blades set at zero pitch. Float blades are attached to finishing blades and are started with a zero to slight pitch. Combo blades are usually started with zero or a very slight pitch and then the blade pitch is gradually increased as the slab hardens and sets. Finishing blades are usually used once the concrete has hardened a little more and the pitch can be set higher to a more acute angle so that the blades ‘burn’ and squeeze the excess water out of the pour.
When pitching you want to avoid pitching the angle too fast to avoid ‘cutting’ into the concrete or slinging mud from the top surface. As a rule of thumb, always start off with a slight angle and increase slowly as required.
STEERING THE WALK-BEHIND POWER TROWEL
Walk behind power trowels have a very simple method for steering the unit – similar to a floor buffer. Pulling up on the handle moves the unit to the left, pushing down on the handle move the unit to the right. An alternative steering method for a walk behind trowel would be to palm down on right handle and palm up on left handle with slight down pressure on the right handle will move the unit right. Palm down on the left handle and palm up on the right handle, with slight down pressure on the left handle will move the unit left. These two simple methods give the operator total control and ease of steering when operating the unit.
STEERING THE RIDE-ON TROWEL
When using ride-on trowels, steering is also a simple process but can take a little time to learn the subtle movements and behaviors of the machine. On a ride-on trowel the operator sits on a chair straddled between two spider assemblies fitted with trowel blades. The operator has two steering control levers to move the machine. One on the right side of his chair and one on their left. The left lever moves in a forward and backward motion which allows the operator to move the unit forward and backward on the left side of the unit. The right handle moves in a ‘cross’ type motion (forward, backward and left and right) this allows the operator to move the unit forward and backward plus move the unit to the left or right.
Moving both handles into the forward potion allows the machine to move forward. Moving both levers into the back position allows the power trowel to move backwards. Moving the right handle to the left moves the machine to the left, and moving the right handle to the right moves the unit to the right. Because the right and left levers can be used simultaneously the range of movement the operator can produce is unique and specific. These types of control handles provide a tremendous range of flexibility in movement. In fact, an experienced power trowel operator can expertly maneuver the power trowel easily around a large surface to ensure full coverage, as well as navigate pillars and obstacles in their path.
GOOD TO GO WITH OPERATING YOUR POWER TROWEL – EMPHASIS ON SAFETY, FINENESS, AND EXPERIENCE.
As discussed, understanding and operating the basic features of a power trowel is quite easy and logical. Following the operations of the machine in the methods described above and operating the machine according to it’s safety specifications will produce great results for all projects.
The critical component of operating a trowel is WHEN to use it and how much to use it on your concrete project. Understanding the nuances of troweling takes experience and finesse. Most contractors have their own methods for determining timing and have preferences and specific specifications for “how much and how long”. By following the simple techniques above and becoming familiar with how your machine operates and behaves on a concrete surface, you will become one of the many artisans who can finish quality concrete.
Original article written by Mike Huggins.